One of the biggest frustrations that I found when working with SharePoint and ADFS integration was that after you create the Identity Provider trust in SharePoint, you can’t add any additional claims… or so it seems. So after being super frustrated with this limitation, I finally just said – there’s gotta be a better way. Turns out that there is!
Before I go through this, I want to give a shout-out to Steve Peschka’s blog post on setting up the initial trust on the SharePoint side. Steve does a great job of giving us instructions for adding the identity provider trust into SharePoint. Here’s a link to that post: http://blogs.technet.com/b/speschka/archive/2010/02/17/creating-both-an-identity-and-role-claim-for-a-sharepoint-2010-claims-auth-application.aspx.
Adding a Claim Mapping
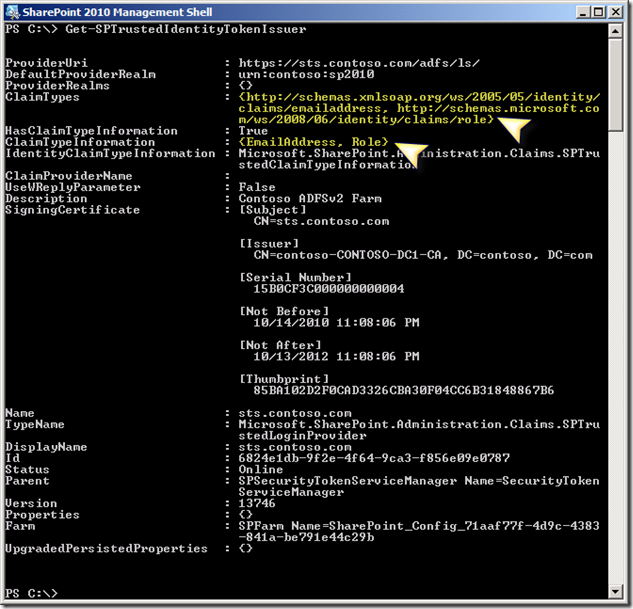
So what do you do if you’ve already created the trust and now you want to add additional claims to it? Here’s how to do it. In this example, I’m going to add the claim http://test/shoesize to identity provider trust called sts.contoso.com. Here’s the trust before the ShoeSize claim is added:
The first thing you need to do is stick your trust into an SPTrustedLoginProvider object:
PS C:\> $ti = Get-SPTrustedIdentityTokenIssuer sts.contoso.com
Second, you will need to add the claim type to the SPTrustedLoginProvider object and update it:
PS C:\> $ti.ClaimTypes.Add(“http://test/shoesize”)
PS C:\> $ti.Update()
Now, if you look at the trust after you add the claim type, you will see it added to the list of ClaimTypes:
Next, you can create the claim mapping:
PS C:\> $map3 = New-SPClaimTypeMapping –IncomingClaimType “http://test/shoesize” –IncomingClaimTypeDisplayName “ShoeSize” –SameAsIncoming
Finally, you will need to add the claim mapping to the trust:
PS C:\> Add-SPClaimTypeMapping –Identity $map3 –TrustedIdentityTokenIssuer $ti
Now you should be able to run Get-SPTrustedIdentityTokenIssuer and see your new claim mapping.
So now we can go into SharePoint and use the claim:
Removing the Claim Mapping
OK, so you know how to add claims, but what about removing them? The process is actually the same in reverse.
First, you need to put the trust into an SPTrustedLoginProvider object, just like you did above:
PS C:\> $ti = Get-SPTrustedIdentityTokenIssuer sts.contoso.com
Next, you will need to put the claim mapping into an object. In this example, I’m going to use the same mapping that we just added, ShoeSize:
PS C:\> foreach ($c in $ti.ClaimTypeInformation) { if ($c.DisplayName –eq “ShoeSize”) { $mapping = $c; } }
What I’m doing here is enumerating through the list of claim mappings and looking for the one whose DisplayName is “ShoeSize”. When I find it, I’m putting it into a variable called $mapping.
Next, you can run the command to Remove the mapping from the trust:
PS C:\> Remove-SPClaimTypeMapping –Identity $mapping –TrustedIdentityTokenIssuer $ti
Now, your trust should have the mapping removed, however the claim type is still there:
So as a final step, we’ll need to remove the claim type from the list:
PS C:\> $ti.ClaimTypes.Remove(“http://test/shoesize”)
PS C:\> $ti.Update()
And that’s it – your claim mapping should be gone:


